Raspberry Pi ဆိုသည္မွာ credit size သာသာရွိေသာ single board computer တစ္ခုျဖစ္ျပီး ေက်ာင္းမ်ားတြင္ computer science မ်ား သင္ၾကားရာတြင္ပိုမိုအေထာက္အကူျပဳႏိုင္ရန္အတြက္ UK ရွိ Raspberry Pi Foundation မွစတင္ခဲ့ ပါသည္၊စတင္ထုတ္လုပ္ျပီးေနာက္ ပိုမို အသုံးတည့္ သျဖင့္သုံးစဲြသူမ်ား စြာရွိခဲ့ပါ သည္။ထြက္ရွိခဲ့ေသာ အမ်ဳိးအစား ႏွစ္မ်ဳိးမွာေအာက္ပါအတိုင္းျဖစ္ပါသည္-
Specifications
Note, the Compute module column refers to the bare Compute module, not connected to any IO board.
| Feature | Model A | Model B | Model A+ | Model B+ | Compute Module |
|---|---|---|---|---|---|
| BRCM2835 SoC | Yes | Yes | Yes | Yes | Yes |
| Standard SoC Speed | 700Mhz | 700Mhz | 700Mhz | 700Mhz | 700Mhz |
| RAM | 256MB | 512MB* | 256MB | 512MB | 512MB |
| Storage | Full SD | Full SD | Micro SD | Micro SD | 4GB eMMC |
| Ethernet 10/100 | No | Yes | No | Yes | No |
| HDMI output port | Yes | Yes | Yes | Yes | Yes |
| Composite video output | Yes | Yes | On 3.5mm jack | On 3.5mm jack | Yes |
| Number of USB2.0 ports | 1 | 2 | 1 | 4 | 1 |
| Expansion header | 26 | 26 | 40 | 40 | N/A |
| Number of available GPIO | 17 | 17 | 26 | 26 | 48 |
| 3.5mm audio jack | Yes | Yes | Audio/Video | Audio/Video | N/A |
| Number of camera interface ports (CSI-2) | 1 | 1 | 1 | 1 | 2 |
| Number of LCD display interface ports (DSI) | 1 | 1 | 1 | 1 | 2 |
| Power (bare, approx, 5v) | 300mA, 1.5W | 700mA, 3.5W | 650mA, 3W | ||
| Size | 85 x 56 x 15mm | 85 x 56 x 17mm | 65 x 56 x 12mm | 85 x 56 x 17mm | 62 x 30 x 3mm |
- Early Model B boards had 256MB RAM
- credit to raspberrypi.org
သင္အသုံးျပဳလိုေသာ ဆက္စပ္သုံးပစၥည္းမ်ားေပၚမူတည္၍ Raspberry Pi ကို တပ္ဆင္အသုံးျပဳ
နည္းမ်ားစြာ ရွိပါသည္။
Power (ပါဝါ)
Raspberry Pi အတြက္ အသုံးျပဳေသာ power connector
( ပါဝါၾကိဳး ) သည္ smart phone စမတ္ဖုန္း မ်ားတြင္ အသုံးမ်ားေသာ micro USB power connector ကိုအသုံးျပဳထားပါသည္။အသုံးျပဳရမည့္ PSU ( power supply unit ) မွာ5V ႏွင့္700mA (0.7A) ခန့္ ရွိရမည္။ အသုံးမ်ား ေသာ PSU မ်ားတြင္ အေထာက္အပံ့ေပးေသာ mA တို့ကို PSU unit တို့တြင္ေရးမွတ္ထားေလ့ရွိသည္။2000mA(2.0A) ထိအေထာက္အပံ့ေပးသည္ကိုေတြ ့ရသည္။
USB
Raspberry Pi တြင္ပါ၀င္ေသာ USB ports မ်ားသည္ ပါ၀ါမ်ားမ်ားသုံးေသာ devices မ်ားကို အသုံးမျပဳႏိုင္ပဲ ၊ ပါ၀ါအစားနည္းေသာ devices မ်ား (~100mA) ကိုသာအသုံးျပဳႏိုင္မည္။ ထိုေၾကာင့္ အျခားဆက္စပ္ အသုံးျပဳလိုေသာအတြက္ လုံေလာက္ေသာ power ကိုရရွိအသုံးျပဳႏိုင္ရန္အတြက္ raspberry pi ရွိ USB port တြင္ ခ်ိတ္ဆက္အသုံးျပဳရမည့္ USB HUB သည္သီးျခားပါ၀ါ အသုံးျပဳရန္ အတြက္ ညႊန္ၾကားထားပါသည္ ။ USB connector
Control
Raspberry Pi ကို တိုက္ရုိက္ control လုပ္ရမည့္ ဆက္စပ္ပစၥည္းမ်ားမွာ Mouse ႏွင့္ Keyboard တို့ျဖစ္ပါသည္။ ထိုကဲ့သို့အသုံးျပဳႏိုင္ရန္အတြက္ wireless စနစ္သုံး သို့ standard USB mouse ႏွင့္ keyboard တို့ကိုအသုံးျပဳရမည္။ PS2 mouse ႏွင့္ keyboard တို့ကိုအသုံးျပဳမည္ ဆိုလွ်င္ USB adapter ၾကားခံပစၥည္း လိုအပ္ မည္ျဖစ္သည္ ။
အကယ္၍ bluetooth စနစ္သုံး mouse ႏွင့္ keyboard တို့ကိုအသုံးျပဳမည္ဆိုပါက အဆိုပါပစၥည္းမ်ားကို ခ်ိတ္ဆက္အသုံးျပဳႏိုင္ရန္ တန္ဖိုးနည္း Bluetooth USB adapter လိုအပ္ျပီး ခ်ိတ္ဆက္သုံးစဲြႏိုင္ရန္ setup ျပဳလုပ္ရမည္ျဖစ္သည္။
Raspberry Pi တြင္ပါ၀င္ေသာ USB ports မ်ားသည္ ပါ၀ါမ်ားမ်ားသုံးေသာ devices မ်ားကို အသုံးမျပဳႏိုင္ပဲ ၊ ပါ၀ါအစားနည္းေသာ devices မ်ား (~100mA) ကိုသာအသုံးျပဳႏိုင္မည္။ ထိုေၾကာင့္ အျခားဆက္စပ္ အသုံးျပဳလိုေသာအတြက္ လုံေလာက္ေသာ power ကိုရရွိအသုံးျပဳႏိုင္ရန္အတြက္ raspberry pi ရွိ USB port တြင္ ခ်ိတ္ဆက္အသုံးျပဳရမည့္ USB HUB သည္သီးျခားပါ၀ါ အသုံးျပဳရန္ အတြက္ ညႊန္ၾကားထားပါသည္ ။
 USB connector
Control
Raspberry Pi ကို တိုက္ရုိက္ control လုပ္ရမည့္ ဆက္စပ္ပစၥည္းမ်ားမွာ Mouse ႏွင့္ Keyboard တို့ျဖစ္ပါသည္။ ထိုကဲ့သို့အသုံးျပဳႏိုင္ရန္အတြက္ wireless စနစ္သုံး သို့ standard USB mouse ႏွင့္ keyboard တို့ကိုအသုံးျပဳရမည္။ PS2 mouse ႏွင့္ keyboard တို့ကိုအသုံးျပဳမည္ ဆိုလွ်င္ USB adapter ၾကားခံပစၥည္း လိုအပ္ မည္ျဖစ္သည္ ။
အကယ္၍ bluetooth စနစ္သုံး mouse ႏွင့္ keyboard တို့ကိုအသုံးျပဳမည္ဆိုပါက အဆိုပါပစၥည္းမ်ားကို ခ်ိတ္ဆက္အသုံးျပဳႏိုင္ရန္ တန္ဖိုးနည္း Bluetooth USB adapter လိုအပ္ျပီး ခ်ိတ္ဆက္သုံးစဲြႏိုင္ရန္ setup ျပဳလုပ္ရမည္ျဖစ္သည္။
Wireless Keyboard and Mouse
Display
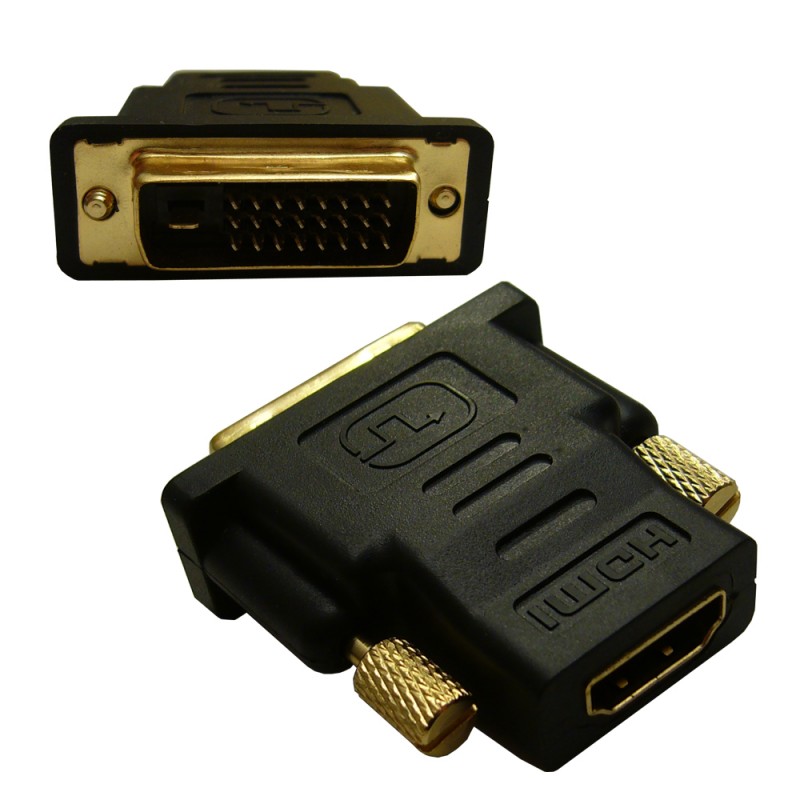
Display ကိုအသုံးျပဳရန္ သင္အတြက္အဆင္ေျပႏိုင္ေသာ ပစၥည္း (TV/LCD monitor )တို့ကိုသုံးႏိုင္ပါသည္ ။TVမ်ားတြင္ HDMI connection အေပါက္မ်ား ႏွင့္ အသစ္ထြက္ LCD Monitor မ်ားတြင္ DVI connection အေပါက္မ်ား ပါရွိျပီး HDMI to DVI adaptor ကိုသင္သုံးစဲြရမည္ျဖစ္ပါသည္။
Display ကိုအသုံးျပဳရန္ သင္အတြက္အဆင္ေျပႏိုင္ေသာ ပစၥည္း (TV/LCD monitor )တို့ကိုသုံးႏိုင္ပါသည္ ။TVမ်ားတြင္ HDMI connection အေပါက္မ်ား ႏွင့္ အသစ္ထြက္ LCD Monitor မ်ားတြင္ DVI connection အေပါက္မ်ား ပါရွိျပီး HDMI to DVI adaptor ကိုသင္သုံးစဲြရမည္ျဖစ္ပါသည္။
HDMI to DVI Adaptor / Cables ေရြးခ်ယ္လွ်င္သတိထားရမည့္အခ်က္မွာ-
photo credit to Networktechinc
DVI ports မ်ားစြာရွိသည့္အထဲတြင္ ပုံတြင္ေဖာ္ျပထားသည့္ DVI-D type( အမွန္ျခစ္ ) သည္ monitor မ်ားစြာတြင္အေထာက္အပံ့ေပးသည္။အေပါက္ေလးေပါက္ပါ DVI-A/DVI-I type ( အမွားျခစ္)ကိုမူ ယင္း type ကိုအေထာက္အပံ့ေပးေသာ monitor တို့တြင္သာအသုံးျပဳႏိုင္မည္ျဖစ္သည္။
Tip : ဆက္စပ္သုံးစဲြမည့္ ပစၥည္းမ်ားကိုRaspberry Pi ႏွင့္ connection ေသခ်ာခ်ိတ္ဆက္ျပီးမွpower on ပါ။သင္အသုံးျပဳမည့္ Display ႏွင့္SDcard တို့အား ခ်ိတ္ဆက္ျခင္း၊ ခ်ိတ္ဆက္မွဳျဖဳတ္လိုသည့္ အခါတိုင္း power ကိုဦးစြာ ပိတ္ျပီးမွ ျပဳလုပ္ပါရန္ ညႊန္ၾကားပါသည္။

- HDMI to DVI adapter

HDMI to VGAကို အသုံးျပဳလိုပါက အသုံးျပဳႏိုင္ပါသည္။ မ်ားေသာအားျဖင့္ယင္းၾကိဳးတို့သည္ ေစ်းၾကီးပါသည္ ။ A passive HDMI/DVI to VGA adapter သည္ Raspberry Pi တြင္အလုပ္မ လုပ္ျခင္းမွာ လိုအပ္ေသာ Analogue signals မ်ားကို Raspberry Pi မွ generated မလုပ္ႏိုင္ေသာေၾကာင့္ ျဖစ္သည္။

- HDMI to VGA

Analogue RCA output သည္ TV အေဟာင္းမ်ား ၊ screen အေသးမ်ားႏွင့္ video capture devicesမ်ားကိုခ်ိတ္ဆက္ အသုံးျပဳႏိုင္ပါသည္။ အေျခခံအသုံးျပဳမည့္သူမ်ားအတြက္ 640*480 resolution သည္ သင့္ေတာ္ပါသည္။ၾကိဳးႏွစ္မ်ဳိးလုံးကိုခ်ိတ္ဆက္ထားပါ RaspberryPi မွ HDMI ကို default အျဖစ္သာေရြး ခ်ယ္ပါမည္။
Internet Connection
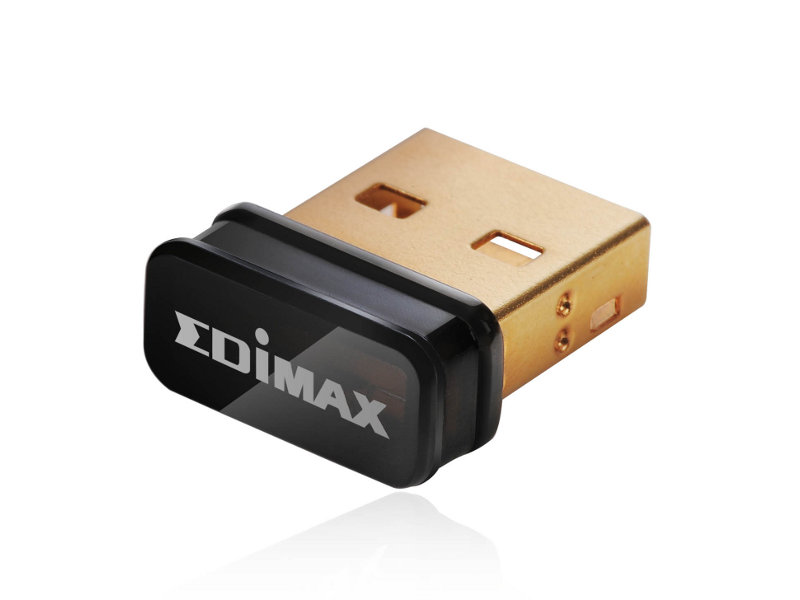
အလြယ္ကူဆုံးနည္းလမ္း တစ္ခုအေနျဖင့္ Internet Connectionခ်ိတ္ဆက္လိုလွ်င္ RJ45 network ၾကိဳး ျဖင့္ သင္၏ router သုိ့ modem အား ခ်ိတ္ဆက္ႏိုင္ျပီး USB Wifi dongle အသုံးျပဳ၍ Wifi connection ကိုခ်ိတ္ဆက္လိုပါကလည္း setup ျပဳလုပ္ရမည္ျဖစ္သည္။
- RJ45

- Wifi Dongle

Basic Equipment ( အေျခခံလိုအပ္ေသာပစၥည္းမ်ား)
၁။ Micro USB Charger ( အနည္းဆုံးပါ၀ါ လိုအပ္ခ်က္ 5V 700mA ) ႏွင့္ micro USB cable တို့လိုအပ္ပါသည္။
၂။ SD Card ( 2Gb အထက္ မွ SDHC 32Gb ) Class 4 recommand ႏွင့္ card reader
၃။ Display အတြက္သင္အသုံးျပဳလိုေသာစက္အတြက္ cable သုိ့ HDMI Cable
၄။ Mouse ႏွင့္ Keyboard ( wireless or wired )
၅။ ပါ၀ါသီးသန့္ေပး၍ရေသာUSB HUB ( USB devices မ်ားကို အျမင့္ဆုံးပါ၀ါ ေပးႏိုင္သည္ကိုညႊန္ၾကားသည္။)
၆။ Network Cable ႏွင့္ အသံအတြက္ audio ၾကိဳး
Recommended Hardware မ်ားကိုေအာက္ေဖာ္ျပပါ site တြင္ ၾကည့္ႏိုင္ပါသည္။
- http://elinux.org/RPi_VerifiedPeripherals
Example Hardware Setup
HDTV Setup
A . Power : Micro USB Charger
B. SD Card : Standard Size SD Card
C. HDMI : Connected to HD TV HDMI input for 1080p & digital audio
D. LAN : Wire connection to network hub/ Switch
E. USB : Wirelwss RF Dongle for Mouse and Keyboard
LCD Monitor Setup

A . Power : Micro USB Charger
B. SD Card : Micro SD Card with Full Size Adapter
C. HDMI : Connected to HDMI to DVI-D adaptor, then into momitor DVI input for 1080p (no audio)
D. LAN : Wire connection to network hub/ Switch
E. USB : USB Mouse and USB Keyboard
F. Audio : 3.5mm Audio out to speakers/ headphones
Video Out Setup
A . Power : Micro USB Charger / High Capacity Mobile Battery (rated output at 5V 700mA or more )
B. SD Card : Micro SD Card with Full Size Adapter
C. RCA Video : Connected to connected toeither TV In/SCart adaptor (European-TV connection )/ USB Video Capture Device
D. LAN : Wire connection to network hub/ Switch
E. USB : USB Mouse and USB Keyboard or Bluetooth/Wirelwss RF Dongle for Mouse and Keyboard
F. Audio : 3.5mm Audio out to speakers/ headphones
SDCard Setup
Raspberry Pi website မွ download ျပဳလုပ္ပါက -
http://www.raspberrypi.org/downloads Download စာမ်က္ႏွာ တြင္သင္အသုံးျပဳလို၍ download လုပ္ထားေသာ ( OS file size ) OSဖိုင္ဆိုဒ္ ျပည့္ျခင္း ၊ ပ်က္စီးမွဳရွိ-မရွိ စစ္ေဆးရန္ (using SHA-1 checksums) ကိုအသုံးျပဳရန္ တိုက္တြန္း ညႊန္ျပထားပါသည္။
သင္အသုံးျပဳလို၍ download လုပ္ထားေသာ OS အတြက္ user name ႏွင့္password တို့ကိုပါ ေရးမွတ္ထားသင့္ပါသည္။
မွတ္ခ်က္ ။ ။ သင္လိုအပ္သည္မွာ-
SDCard 2Gb သို့ 2Gb ထက္ပိုေသာ ( သင္အသုံးျပဳလိုေသာ OS ႏွင့္ အျခားလိုအပ္ခ်က္မ်ား)
SD Card Reader
Linux/ Windows အသုံးျပဳႏိုင္ေသာ ကြန္ပ်ဴတာမွလည္း SD card သုိ့ မိမိအသုံးျပဳလိုေသာ operating system ကို ထည့္သြင္းႏိုင္ပါသည္။
SD card setup with Windows ( Windows မွ SD ကဒ္အတြင္းသို့ ေရးထည့္ျခင္း )
(၁) ဦးစြာပထမ operating system zip ဖိုင္ကို download ျပဳလုပ္ပါ ။
(၂) ျပီးေနာက္ zip file ကို ေျဖပါ။ tar/bz2 ဖိုင္ေျဖရန္အတြက္ Pea Zip ကို www.peazip.com တြင္ရယူအသုံးျပဳႏိုင္ပါသည္။
(၃) extract ျပဳလုပ္ျပီးေနာက္ .img (2Gb) ပမာဏရွိေသာ ဖိုင္ကို ရရွိမည္။
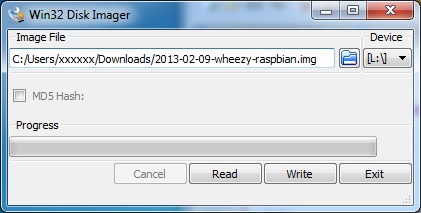
(၄) .img ဖိုင္ ကို SD card အတြင္းထည့္သြင္းႏိုင္ရန္အတြက္ Window32DiskImager ကိုhttp://www.raspberrypi.org/downloads သုိ့
http://sourceforge.net/projects/win32diskimager/files/latest/download တြင္ရယူအသုံးျပဳႏိုင္ပါသည္။
(၅) မွတ္ခ်က္ ။ အျခား sd card မ်ား ၊memory stick မ်ားကို ျဖဳတ္ထားပါ။မွားယြင္း၍ format ရိုက္ မိမည့္အတြက္ျဖစ္ပါသည္။
သင္၏ sd card ကို card reader အတြင္းသို့ထည့္ျပီးေနာက္
သင္extract ျပဳလုပ္ထားေသာ .img ဖိုင္ကိုေရြး၍ အသုံးျပဳႏိုင္ပါသည္။

သင္ထည့္သြင္းလိုေသာ sd card ၏ Drive letter ကိုေရြးပါ ။အဆိုပါ လုပ္ေဆာင္ခ်က္ သည္ သင္၏ sd card ရွိ data မ်ားအားဖ်က္လိုက္မည္ ျဖစ္သည္။
write ကိုႏွိပ္ျပီးေနာက္သင္၏ sd card အတြင္း program မွ OS ကို ထည့္သြင္းေပးသြားမည္ျဖစ္ပါသည္။
Writing an SD card from OSX (MAC OSX မွ SD ကဒ္အတြင္းသို့ ေရးထည့္ျခင္း )

- SD card Set up from MAC

၁။Terminal Utility ကို/Applications/Utilities တို့မွတဆင့္ ၀င္ေရာက္
၍ command line prompt အသုံးျပဳရန္အတြက္ ဖြင့္ပါ ။
၂။ သင္၏ SD card ကို ကြန္ပ်ဴတာအတြင္းသို့ မထည့္ ထားပဲ CLI တြင္ df -h ဟုရုိက္ပါက df program မွ သင့္ကြန္ပ်ဴတာအတြင္းရွိ Harddisk volumes ႏွင့္ free space ပမာဏ တို့ကိုေသခ်ာစြာ ေရးမွတ္ထားပါ။
၃။ ယခု SD card ကို ထည့္ျပီးေနာက္ df -h ဟုထပ္မံရုိက္ပါ ။
၄။ ယခင္ SD card မထည့္မွီ ႏွင့္ ထည့္ျပီးေနာက္ ေဖာ္ျပေသာ ကြာျခားခ်က္တို့ကို စစ္ေဆးျပီးေနာက္ သင္ SD card ၏ ပမာဏ ႏွင့္ အမည္ တုိ့ကို သင္ေတြ့ရမည္။ ဥပမာ - /Volumes/Untitled အေနျဖင့္ mount ေနျပီး ၊ device ၏အမည္ကို /dev/disk3s1ဟု သင္ျမင္ရမည္။သင့္ SD card အမည္ႏွင့္ volume တို့ကို ေရးမွတ္ထားပါ။
၅။SD card အတြင္း OS ထည့္သြင္းျခင္းမျပဳမွီ unmount ျပန္လုပ္ရမည္ ။unmount ျပဳလုပ္ရန္ အတြက္ -
sudo diskutil unmount /dev/disk3s1
(မွတ္ခ်က္။ ။ /dev/disk3s1 ေနရာတြင္ သင္ခုနကေရးမွတ္ထားေသာ သင့္ SD card ၏ အမည္ကို ေရးပါ။) အထက္ပါ command line သုိ့ Disk Utility ကိုအသုံးျပဳ၍ လည္း သင္ unmount ျပဳလုပ္ႏိုင္သည္။
၆။ /dev/disk3s1 ေနရာတြင္ /dev/rdisk3 ဟုအမည္ေျပာင္းပါ ။ယခုလိုအမည္ေျပာင္းရာတြင္ အေရးအၾကီးဆုံး မွာ SD card အမည္ ကိုေသခ်ာစြာ df -h ဟုထပ္မံရုိက္ စစ္ေဆးျပီးမွသာျပဳလုပ္ သင့္ပါသည္။*****သင္မွားယြင္း၍ သင္၏ hard drive ကို ျပဳလုပ္မိပါက data မ်ားေပ်ာက္ ဆုံးႏိုင္ပါသည္။*****
၇။ သင့္ကြန္ပ်ဴတာ၏ home directory အတြင္း သို့ image file ကိုထားပါ။ သင္ယခု Unix utility တစ္ခုျဖစ္ေသာ dd command ကိုအသုံးျပဳ၍ .img ဖိုင္ကို SD card အတြင္းသို့ကူးထည့္မည္။
ေအာက္ေဖာ္ျပပါ command ကိုသုံးပါမည္။
sudo dd bs=1m if=~/2013-09-18-wheezy-raspbian.img of=/dev/rdisk3
sudo = Super User Do as root user
dd = Unix utility command
bs=1m = ကူးယူမည့္ႏွဳန္း 1m သည္ 1MB ကို ရည္ညႊန္းသည္
if=~/2013-09-18-wheezy-raspbian.img = input file source
of=/dev/rdisk3 = output file source
၈။ image ဖိုင္ကူးယူရန္မိနစ္အနည္းငယ္ၾကာပါမည္။ ကူးေရးျပီးေနာက္ status ျပျပီးေနာက္သင့္ SD card ကို စတင္၍ Raspberry Pi တြင္တပ္ဆင္၍ အသုံးျပဳႏိုင္မည္ျဖစ္သည္။
Writing an SD card from Linux ( Linux မွ SD ကဒ္အတြင္းသို့ ေရးထည့္ျခင္း )
၁။Terminal Utility ကို/Applications/Utilitiesတို့မွတဆင့္ ၀င္ေရာက္
၍ command line prompt အသုံးျပဳရန္အတြက္ ဖြင့္ပါ ။(Ctrl+Alt+T)
၂။ သင္၏ SD card ကို ကြန္ပ်ဴတာအတြင္းသို့ မထည့္ ထားပဲ CLI တြင္ df -hဟုရုိက္ပါက df program မွ သင့္ကြန္ပ်ဴတာအတြင္းရွိ Harddisk volumes ႏွင့္ free space ပမာဏ တို့ကိုေသခ်ာစြာ ေရးမွတ္ထားပါ။
၃။ ယခု SD card ကို ထည့္ျပီးေနာက္ df -h ဟုထပ္မံရုိက္ပါ ။
၄။ ယခင္ SD card မထည့္မွီ ႏွင့္ ထည့္ျပီးေနာက္ ေဖာ္ျပေသာ ကြာျခားခ်က္တို့ကို စစ္ေဆးျပီးေနာက္ သင္ SD card ၏ ပမာဏ ႏွင့္ အမည္ တုိ့ကို သင္ေတြ့ရမည္။ ဥပမာ - /media/DATA အေနျဖင့္ mount ေနျပီး ၊ device ၏အမည္ကို /dev/sdb1ဟု သင္ျမင္ရမည္။သင့္ SD card အမည္ႏွင့္ volume တို့ကို ေရးမွတ္ထားပါ။
၅။SD card အတြင္း OS ထည့္သြင္းျခင္းမျပဳမွီ unmount ျပန္လုပ္ရမည္ ။unmount ျပဳလုပ္ရန္ အတြက္ -
sudo umount /dev/sdb1
(မွတ္ခ်က္။ ။ /dev/sdb1 ေနရာတြင္ သင္ခုနကေရးမွတ္ထားေသာ သင့္ SD card ၏ အမည္ကို ေရးပါ။) အထက္ပါ command line သုိ့ Disk Utility ကိုအသုံးျပဳ၍ လည္း သင္ unmount ျပဳလုပ္ႏိုင္သည္။
၆။ေသခ်ာစြာ df -h ဟုထပ္မံရုိက္ စစ္ေဆးျပီးမွသာျပဳလုပ္ သင့္ပါသည္။*****သင္မွားယြင္း၍ သင္၏ hard drive ကို ျပဳလုပ္မိပါက data မ်ားေပ်ာက္ ဆုံးႏိုင္ပါသည္။*****
၇။ သင့္ကြန္ပ်ဴတာ၏ home directory အတြင္း သို့ image file ကိုထားပါ။ သင္ယခု Unix utility တစ္ခုျဖစ္ေသာ dd command ကိုအသုံးျပဳ၍ .img ဖိုင္ကို SD card အတြင္းသို့ကူးထည့္မည္။
ေအာက္ေဖာ္ျပပါ command ကိုသုံးပါမည္။
sudo dd bs=1m if=~/2013-09-18-wheezy-raspbian.img of=/dev/sdb
Ubuntu OS အသုံးျပဳသူမ်ားအေနျဖင့္ ImageWriter အမည္ျဖင့္ Ubuntu Software Center တြင္ရွာေဖြ ထည့္သြင္းအသုံးျပဳႏိုင္ပါသည္။
let me introduce my Pi Testing at Home video
http://youtu.be/CNNc8d9-vOA
http://youtu.be/SxIptd-cXrY
Inspired by the original Rasperry Leaf but for the 40 pins of a Raspberry B+.
Print it, optionally laminate it, poke some holes in it and slip it over the GPIO pins of your Raspberry.
https://github.com/splitbrain/rpibplusleaf/blob/master/README.md
Have a nice day ...
Chit Ko Ko Win
saintjohn769@ubuntu.com
http://chitkoko.ubuntu-mm.net , www.chitkokowin.com
http://ask.ubuntu-mm.net


i am a beginner plz guide me,zinmeshinthant@gmail.com
ReplyDelete